
If you are doing any Kernel development, using any of the available APIs or hacking away at it for various reasons, LXR can be a developers best friend. And lets face it, you (or your developers) saving time is money/time well spent in the eyes of management. LXR has allowed me and others to determine changes in the Kernel, further understanding of subsystems and allowed us to port patches to newer revisions. So a few times we have attempted without all that much success - our own LXR indexer.
If there has been one thing that has really frustrated me with LXR is the lack of complete documentation for LXR/LXRng. I have attempted this for unsuccessfully Fedora and successfully for Ubuntu in the past. Recently I reattempted this issue and managed to get it running on CentOS 5.9. Here are the steps that I used:
In case you didn't know what LXR is:
LXR is a general purpose source code indexer and cross-referencer that provides web-based browsing of source code with links to the definition and usage of any identifier. It supports a wide choice of languages. LXR used to stand for "Linux Cross-Referencer" but it has proved generic enough to be able to cross reference any project beyond the Linux kernel. It is based on stock web technology (meaning its output is regular HTML), so the display client may be freely chosen from the available web browsers. It was a design choice not to use Java or any other client-side scripting language to minimise dependencies and system requirements. - taken from the LXR projects website
This tutorial assumes that you have some sort of understanding about Linux and have some sort of computing competency and while no guarentees can be given - I may have missed a step or two recompiling this howto (so feel free to fire me an email or leave a comment below) .
Initial System Setup
Start by plugging in whatever media you need to setup
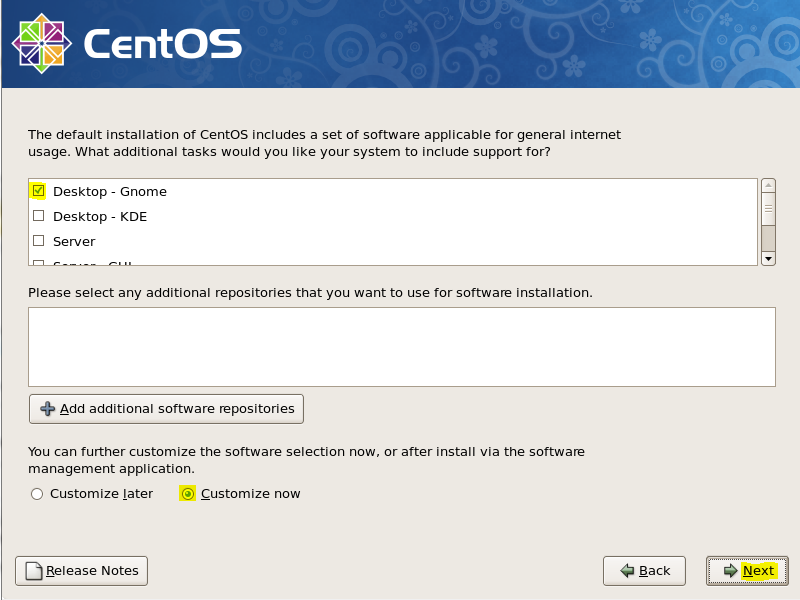
Then configure the system as Gnome Desktop and configure now. Press next.
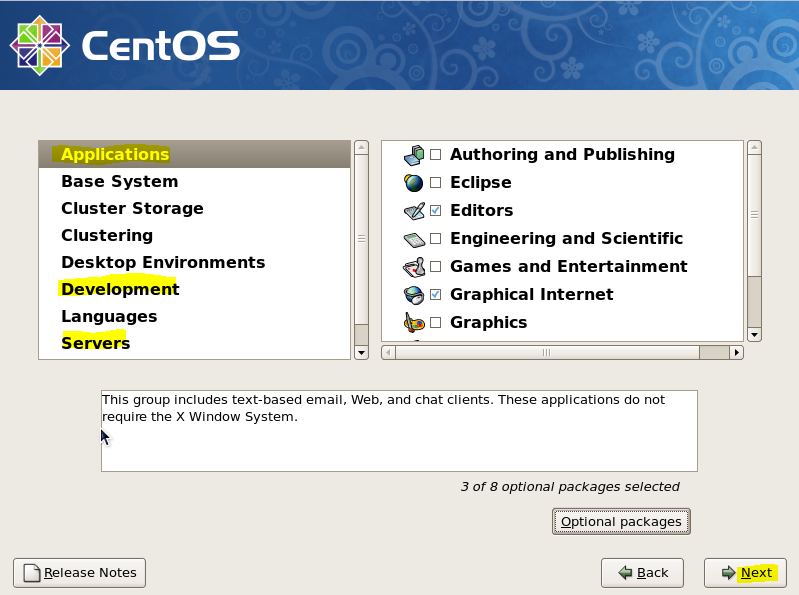
Now select the categories you would like to install - under development choose Development Tools and Development Libraries. Also select under Servers, Web Server and Postgres SQL Server.
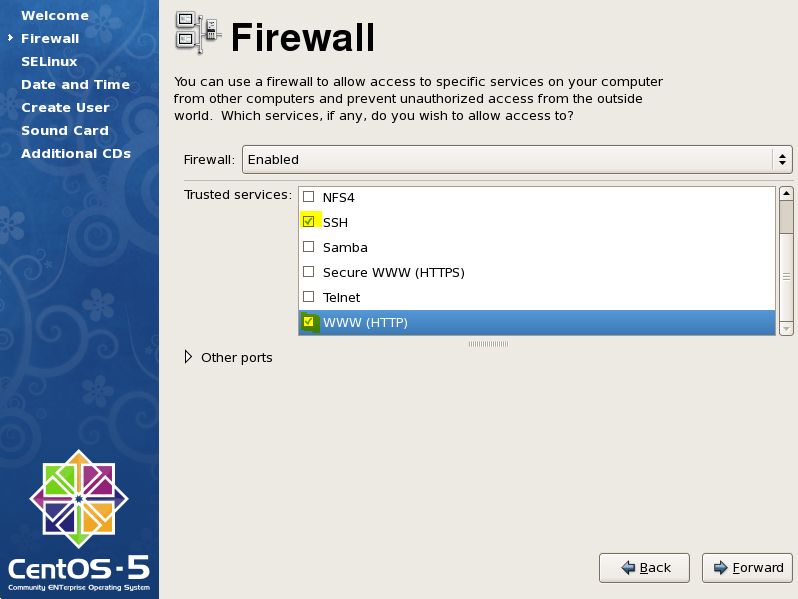
Continue the installation until it has finished, and at the firewall prompt choose to allow HTTP & SSH (optional). I disabled SeLinux for the purposes of this document.
Add RHEL, Xapian, RPMForge Repos
By default, the CentOS distribution needs a larger base in which to install packages from. The following steps will allow you to enable the above package repositories
-
wget http://dl.fedoraproject.org/pub/epel/5/i386/epel-release-5-4.noarch.rpm
-
sudo rpm -Uvh epel-release-5*.rpm
Now install the RPM Forge repository
-
wget http://packages.sw.be/rpmforge-release/rpmforge-release-0.5.2-2.el5.rf.x86_64.rpm
-
sudo rpm --import http://apt.sw.be/RPM-GPG-KEY.dag.txt
-
sudo rpm -ivh rpmforge-release-0.5.2-2.el5.rf.x86_64.rpm
Now install the Xapian repository (this is for the LXR searching code)
-
sudo rpm -ivh http://rpm.eprints.org/rpm-eprints-org-key-1-1.noarch.rpm
-
sudo rpm -ivh http://rpm.eprints.org/xapian/6/noarch/rpm-eprints-org-xapian-6-1.noarch.rpm
Now lets update the system
sudo yum update
Install Prerequisities
Now lets install the following:
yum install git inkscape postgresql postgresql-server ctags perl-CGI-Ajax perl-CGI-Simple perl-DBD-Pg perl-HTML-Parser perl-Template-Toolkit perl-Term-ProgressBar perl-Term-Size perl-TermReadKey perl-Devel-Size gcc gcc-c++ perl-ExtUtils-MakeMaker perl-CPAN perl-YAML libpng libpng-devel texinfo perl-Digest-SHA1 wget httpd make icoutils xapian-core gifsicle xapian-bindings-{php,python,tcl8,perl,ruby} ncftp
Using Perl's CPAN shell, configure it and install the following:
-
sudo perl -MCPAN -e shell
-
-
/usr/lib/perl5/5.8.8/CPAN/Config.pm initialized.
-
-
-
CPAN is the world-wide archive of perl resources. It consists of about
-
100 sites that all replicate the same contents all around the globe.
-
Many countries have at least one CPAN site already. The resources
-
found on CPAN are easily accessible with the CPAN.pm module. If you
-
want to use CPAN.pm, you have to configure it properly.
-
-
If you do not want to enter a dialog now, you can answer 'no' to this
-
question and I'll try to autoconfigure. (Note: you can revisit this
-
dialog anytime later by typing 'o conf init' at the cpan prompt.)
-
-
Are you ready for manual configuration? [yes] yes
-
-
-
The following questions are intended to help you with the
-
configuration. The CPAN module needs a directory of its own to cache
-
important index files and maybe keep a temporary mirror of CPAN files.
-
This may be a site-wide directory or a personal directory.
-
-
-
-
First of all, I'd like to create this directory. Where?
-
-
CPAN build and cache directory? [/home/rbrash/.cpan]
-
-
-
If you want, I can keep the source files after a build in the cpan
-
home directory. If you choose so then future builds will take the
-
files from there. If you don't want to keep them, answer 0 to the
-
next question.
-
-
-
-
How big should the disk cache be for keeping the build directories
-
with all the intermediate files?
-
-
Cache size for build directory (in MB)? [10]
-
-
-
By default, each time the CPAN module is started, cache scanning
-
is performed to keep the cache size in sync. To prevent from this,
-
disable the cache scanning with 'never'.
-
-
Perform cache scanning (atstart or never)? [atstart]
-
-
-
To considerably speed up the initial CPAN shell startup, it is
-
possible to use Storable to create a cache of metadata. If Storable
-
is not available, the normal index mechanism will be used.
-
-
Cache metadata (yes/no)? [yes]
-
-
-
The next option deals with the charset your terminal supports. In
-
general CPAN is English speaking territory, thus the charset does not
-
matter much, but some of the aliens out there who upload their
-
software to CPAN bear names that are outside the ASCII range. If your
-
terminal supports UTF-8, you say no to the next question, if it
-
supports ISO-8859-1 (also known as LATIN1) then you say yes, and if it
-
supports neither nor, your answer does not matter, you will not be
-
able to read the names of some authors anyway. If you answer no, names
-
will be output in UTF-8.
-
-
Your terminal expects ISO-8859-1 (yes/no)? [yes]
-
-
-
If you have one of the readline packages (Term::ReadLine::Perl,
-
Term::ReadLine::Gnu, possibly others) installed, the interactive CPAN
-
shell will have history support. The next two questions deal with the
-
filename of the history file and with its size. If you do not want to
-
set this variable, please hit SPACE RETURN to the following question.
-
-
File to save your history? [/home/rbrash/.cpan/histfile]
-
Number of lines to save? [100]
-
-
-
The CPAN module can detect when a module that which you are trying to
-
build depends on prerequisites. If this happens, it can build the
-
prerequisites for you automatically ('follow'), ask you for
-
confirmation ('ask'), or just ignore them ('ignore'). Please set your
-
policy to one of the three values.
-
-
Policy on building prerequisites (follow, ask or ignore)? [ask]
-
-
-
The CPAN module will need a few external programs to work properly.
-
Please correct me, if I guess the wrong path for a program. Don't
-
panic if you do not have some of them, just press ENTER for those. To
-
disable the use of a download program, you can type a space followed
-
by ENTER.
-
-
Where is your gzip program? [/usr/bin/gzip]
-
Where is your tar program? [/bin/tar]
-
Where is your unzip program? [/usr/bin/unzip]
-
Where is your make program? [/usr/bin/make]
-
Where is your links program? [/usr/bin/links]
-
Where is your wget program? [/usr/bin/wget]
-
Warning: ncftpget not found in PATH
-
Where is your ncftpget program? []
-
Where is your ncftp program? [/usr/bin/ncftp]
-
Where is your ftp program? [/usr/bin/ftp]
-
Where is your gpg program? [/usr/bin/gpg]
-
What is your favorite pager program? [/usr/bin/less]
-
What is your favorite shell? [/bin/bash]
-
-
-
Every Makefile.PL is run by perl in a separate process. Likewise we
-
run 'make' and 'make install' in processes. If you have any
-
parameters (e.g. PREFIX, LIB, UNINST or the like) you want to pass
-
to the calls, please specify them here.
-
-
If you don't understand this question, just press ENTER.
-
-
Parameters for the 'perl Makefile.PL' command?
-
Typical frequently used settings:
-
-
PREFIX=~/perl non-root users (please see manual for more hints)
-
-
Your choice: []
-
Parameters for the 'make' command?
-
Typical frequently used setting:
-
-
-j3 dual processor system
-
-
Your choice: []
-
Parameters for the 'make install' command?
-
Typical frequently used setting:
-
-
UNINST=1 to always uninstall potentially conflicting files
-
-
Your choice: []
-
-
-
Sometimes you may wish to leave the processes run by CPAN alone
-
without caring about them. As sometimes the Makefile.PL contains
-
question you're expected to answer, you can set a timer that will
-
kill a 'perl Makefile.PL' process after the specified time in seconds.
-
-
If you set this value to 0, these processes will wait forever. This is
-
the default and recommended setting.
-
-
Timeout for inactivity during Makefile.PL? [0]
-
-
-
If you're accessing the net via proxies, you can specify them in the
-
CPAN configuration or via environment variables. The variable in
-
the $CPAN::Config takes precedence.
-
-
Your ftp_proxy?
-
Your http_proxy?
-
Your no_proxy?
-
You have no /home/rbrash/.cpan/sources/MIRRORED.BY
-
I'm trying to fetch one
-
CPAN: LWP::UserAgent loaded ok
-
Fetching with LWP:
-
ftp://ftp.perl.org/pub/CPAN/MIRRORED.BY
-
-
-
Now we need to know where your favorite CPAN sites are located. Push
-
a few sites onto the array (just in case the first on the array won't
-
work). If you are mirroring CPAN to your local workstation, specify a
-
file: URL.
-
-
First, pick a nearby continent and country (you can pick several of
-
each, separated by spaces, or none if you just want to keep your
-
existing selections). Then, you will be presented with a list of URLs
-
of CPAN mirrors in the countries you selected, along with previously
-
selected URLs. Select some of those URLs, or just keep the old list.
-
Finally, you will be prompted for any extra URLs -- file:, ftp:, or
-
http: -- that host a CPAN mirror.
-
-
(1) Africa
-
(2) Asia
-
(3) Europe
-
(4) North America
-
(5) Oceania
-
(6) South America
-
Select your continent (or several nearby continents) [] 4
-
Sorry! since you don't have any existing picks, you must make a
-
geographic selection.
-
-
(1) Canada
-
(2) Costa Rica
-
(3) Mexico
-
(4) United States
-
Select your country (or several nearby countries) [] 1
-
Sorry! since you don't have any existing picks, you must make a
-
geographic selection.
-
-
(1) ftp://CPAN.mirror.rafal.ca/pub/CPAN/
-
(2) ftp://cpan.sunsite.ualberta.ca/pub/CPAN/
-
(3) ftp://ftp.nrc.ca/pub/CPAN/
-
(4) ftp://mirror.arcticnetwork.ca/pub/CPAN/
-
(5) ftp://mirror.csclub.uwaterloo.ca/CPAN/
-
(6) ftp://mirror.its.dal.ca/cpan/
-
(7) ftp://mirror.vexxhost.com/cpan/
-
(8) http://cpan.perlnow.com/
-
(9) http://httpupdate25.cpanel.net/CPAN/
-
(10) http://mirrors.gossamer-threads.com/CPAN/
-
Select as many URLs as you like (by number),
-
put them on one line, separated by blanks, e.g. '1 4 5' [] 1 2 3 4 5 6 7 8 9 10
-
-
Enter another URL or RETURN to quit: []
-
New set of picks:
-
ftp://CPAN.mirror.rafal.ca/pub/CPAN/
-
ftp://cpan.sunsite.ualberta.ca/pub/CPAN/
-
ftp://ftp.nrc.ca/pub/CPAN/
-
ftp://mirror.arcticnetwork.ca/pub/CPAN/
-
ftp://mirror.csclub.uwaterloo.ca/CPAN/
-
ftp://mirror.its.dal.ca/cpan/
-
ftp://mirror.vexxhost.com/cpan/
-
http://cpan.perlnow.com/
-
http://httpupdate25.cpanel.net/CPAN/
-
http://mirrors.gossamer-threads.com/CPAN/
-
-
-
commit: wrote /usr/lib/perl5/5.8.8/CPAN/Config.pm
-
Terminal does not support AddHistory.
-
-
cpan shell -- CPAN exploration and modules installation (v1.7602)
-
ReadLine support available (try 'install Bundle::CPAN')
Now the modules
-
sudo perl -MCPAN -e 'install Search::Xapian'
-
sudo perl -MCPAN -e 'install Class::Accessor'
-
sudo perl -MCPAN -e 'install Class::MethodMaker'
-
sudo perl -MCPAN -e 'install Devel::Size'
-
sudo perl -MCPAN -e 'install Digest::SHA'
-
sudo perl -MCPAN -e 'install HTML::Parser'
-
sudo perl -MCPAN -e 'install IO::Stringy'
-
sudo perl -MCPAN -e 'install PerlIO::gzip'
-
sudo perl -MCPAN -e 'install Template'
-
sudo perl -MCPAN -e 'install HTML::Entities'
Install and Configure LXR
-
cd /opt
-
sudo git clone git://lxr.linux.no/git/lxrng.git
-
cd lxrng
-
cp lxrng.conf-dist lxrng.conf
-
cp apache2-site.conf-dist-cgi apache2-site.conf
Now change your user to root:
-
su -
-
chkconfig httpd on
-
chkconfig postgresql on
-
service postgresql start
-
/etc/init.d/httpd start
-
exit
Now change your user to the postgres user
-
su -
-
su - postgres
-
createdb lxrng
-
-
createuser www-data
-
Shall the new role be a superuser? (y/n) n
-
Shall the new role be allowed to create databases? (y/n) n
-
Shall the new role be allowed to create more new roles? (y/n) n
-
CREATE ROLE
-
-
createuser apache
-
Shall the new role be a superuser? (y/n) n
-
Shall the new role be allowed to create databases? (y/n) n
-
Shall the new role be allowed to create more new roles? (y/n) n
-
CREATE ROLE
-
-
createuser lxr
-
Shall the new role be a superuser? (y/n) n
-
Shall the new role be allowed to create databases? (y/n) n
-
Shall the new role be allowed to create more new roles? (y/n) n
-
CREATE ROLE
-
-
createuser lxradmin
-
Shall the new role be a superuser? (y/n) n
-
Shall the new role be allowed to create databases? (y/n) y
-
Shall the new role be allowed to create more new roles? (y/n) n
-
CREATE ROLE
-
-
cd /opt/lxrng/
Create and change the permissions for the following directories
-
sudo mkdir /var/lib/lxrng/text-db -p
-
sudo mkdir /var/lib/lxrng/cache
-
sudo chmod a+rw /var/lib/lxrng
-
sudo chmod a+rw /var/lib/lxrng/cache/
We are getting close to finishing up here, grab a coffee after starting the download:
-
sudo make -C /opt/lxrng/webroot/.static/gfx
-
sudo mkdir -p /var/lib/lxrng/repos/
-
sudo cd /var/lib/lxrng/repos/
-
sudo hit clone git://git.kernel.org/pub/scm/linux/kernel/git/torvalds/linux-2.6.git
-
sudo cd linux-2.6/
-
sudo git tag
Edit the configuration file using sed
-
cd /opt/lxrng/
-
sudo sed -i 's:@@LXRURL@@::' apache2-site.conf
-
sudo sed -i 's:@@LXRROOT@@:/opt/lxrng:' apache2-site.conf
Uncomment the following line in: apache2-site.conf
-
# For LXRng installed directly in the web site root, use
-
ScriptAlias / "/opt/lxrng/webroot/lxr.cgi/"
-
# otherwise use (no trailing slash):
-
# ScriptAlias / "/opt/lxrng/webroot/lxr.cgi"
-
...
Edit lxrng.conf using vi lxrng.conf
-
...
-
'base_url' =>'http://localhost/',
-
...
-
'ver_default' =>; 'v2.6.34',
-
...
Now prepare a symlink
sudo ln -s /opt/lxrng/apache2-site.conf /etc/httpd/conf.d/.
Setup the postgres database and start the lxr referencing
-
su -
-
su - postgres
-
./lxr-db-admin linux --init
-
./lxr-genxref linux
-
exit
Restart apache and goto localhost in your browser of choice
sudo /etc/init.d/httpd restart
And now your LXR installation should be up and running locally :)
References
http://xapian.org/download
http://www.rackspace.com/knowledge_center/article/installing-rhel-epel-repo-on-centos-5x-or-6x
http://perl.about.com/od/packagesmodules/qt/perlcpan.htm
https://github.com/yasuaki/lxrng/blob/master/INSTALL
http://mohammadthalif.wordpress.com/2010/07/24/how-to-setup-lxr-–-step-by-step-guide-3/
http://www.sungju.org/?p=434
http://wiki.centos.org/AdditionalResources/Repositories/RPMForge
| Attachment | Size |
|---|---|
| 139.61 KB | |
| 153.73 KB | |
| 141.44 KB | |
| 73.56 KB |
Add new comment